How to Create a Snow Brush
Well Christmas is coming soon and hopefully the lockdown restrictions will have eased so we can all be with family to have a nice end to the year from hell.
I thought for a bit of fun I would show you how to make a snow brush and add snow to one of your winter images.
Step 1 – Create a base for our brush
Open the New Document Dialog with the keyboard shortcut CTRL+N(Win) CMD+N(Mac).

Set the units to pixels and the width and height to 500. Resolution will be fine at 72 Pixels/Inch.
Don’t change anything else and Click Create. A 500 pixel square white document will open.
Step 2 – Create a Basic Brush
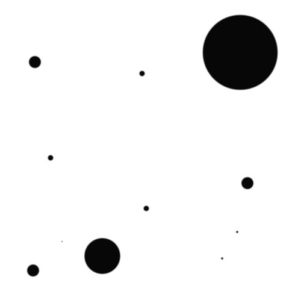
On our canvas we are going to place some round dots of different sizes to represent the different sizes of snowdrop.
Select the Brush Tool from the toolbox, or press the B key.

Then make sure the Foreground colour is set to black.
You can do this by pressing the D key to reset the Foreground and Background colours to black and white.
![]()
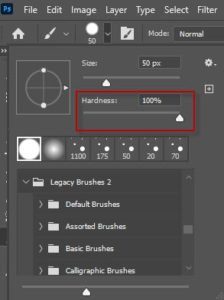
Set the hardness of the brush to 100%
Place a series of dots on the background of different sizes to represent our snow.
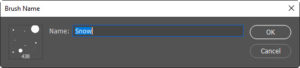
Then save it out as a New Brush Preset and call it Snow then click OK.
Step 3 – Add Dynamics to the Brush.
The brush has been created using black as the Foreground colour which is no good for snow.
So toggle the Foreground and Background colours by pressing the X key. Now white should be the Foreground colour.
![]()
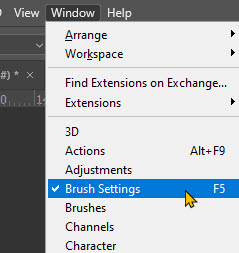
Open the Brush Settings dialog from the Window menu.
Click on Brush Tip Shape and change the Spacing to 15%.

Click on Shape Dynamics
Set Size Jitter to 100%
Angle Jitter to 100%
Minimum Roundness to 70%
A preview of the brush will be in the preview pane at the bottom of the Brush panel.
Click on Scattering
Change Scatter to 800%
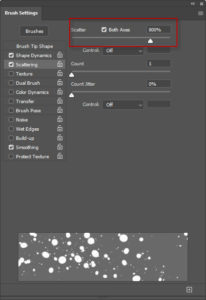
Click on Transfer
Set the Opacity Jitter to 100%
.

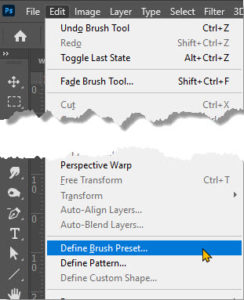
Click on the New Brush Icon in the Brush Settings Panel and in the dialog type a name. Make sure the three tick boxes have a tick in them and click OK.
That’s our dynamic brush completed.

- Add Snow to our Image
We are going to add snow in a number of layers. First create a new empty layer with the keyboard shortcut CTRL+SHIFT+N(Win) CMD+SHIFT+N(Mac)
This will be named Layer 0, rename this Distant Snow.
Set the brush size to 35 pixels and paint in the snow in the background areas of the image.
As the background is blurry then to match the snow would be blurry so add a Gaussian Blur (Filter > Blur > Gaussian Blur)of 5 Pixels to this layer.

Then create another new layer and call it Middle Snow. Change the brush size to about 100 pixels and scatter about some snow. This snow is going to be closer to the camera so lets add a lower Gaussian Blur value of 3 pixels to this layer.
In addition to this lets give this snow a bit of movement with a Motion Blur.(Filter > Blur > Motion Blur).
Set the angle to 60 degrees and the distance to 30 pixels.

Add another empty layer and call it Close Snow. Change the brush size to about 600 pixels and scatter some more snow on this layer.
Then add a Motion Blur of about 90 pixels followed by a Gaussian Blur of 9 Pixels to soften off the edges of the snowdrops.


And we are done…..

The great thing about this method is you have complete control. Each layer can be moved, rotated and repositioned to suit you. If a snowflake is across a face and you want to remove it, just choose the Eraser tool and erase it from the appropriate layer.
You can add more layers of snow if you think it needs it.
NOTE:
The numbers used in the brush sizes and blurs are appropriate for my image size of 1920 x 1280 pixels. If you use images larger or smaller you will have to experiment with different numbers to get the same effect.
Download Workfile from Pixabay.com
https://pixabay.com/photos/deer-wildlife-mammal-winter-snow-3043033/
If you found this tutorial useful please subscribe to my Youtube Channel
Also find us on Facebook and give my page a like
Excellent video as usual. Thank you.